My Orders bundle for NetSuite |
Purchasing My Orders |
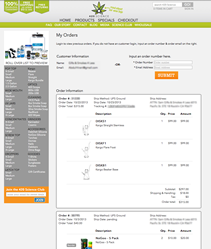
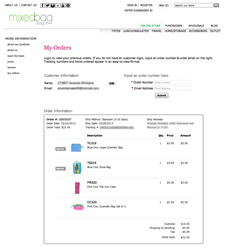
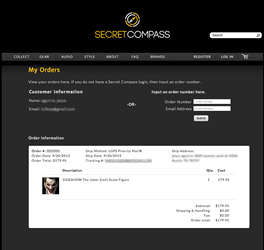
My Orders by MVL Web Tech / MVL Design is a NetSuite customer center replacement / supplement. It displays sales orders in an Amazon-like layout. Your customers can see a single sales order or their entire sales history. They can get tracking numbers, order status and even reorder items. It is much simpler, clearer and easier to use than the normal NetSuite Customer Center (My Account page). For most uses, it can completely replace it!. And, it gives your customers another reason for visiting your website. Introducing My Orders bundle for NetSuite. The bundle includes all the code to allow for an information item to be created that is a single, simple page where your users can go to: see previous orders, check tracking numbers and shipping dates, and reorder items quickly. One bundled item can work on multiple NetSuite multi-sites. For large orders, the list of items only displays when requested via a button click. Really cool and very useful those those who sell wholesale as such large orders can sometimes have up to 100 items and multiple tracking numbers. There are three ways the page can be used. If a person is logged in and visits the page, up to their last 30 orders are displayed. If they are not logged in they have the ability to log in right from the page and then their orders display. If they don't have a login, then they can input their Order Number and Order Email to see the one order. Finally, you can put the order number and email into a URL so when they visit the page, their order is displayed, without them having to login. This is great for order confirmation & fulfillment emails you send out to your customers: it could have a link they click on that takes them right to the order info! I know tracking numbers and order details can be placed within emails, but wouldn't it be better to have your customers visit your site to get that info? This way you can engage them one more time, and maybe make another sale. To see the third method of viewing an order with the bundle in action visit: www.netsuitetestsite.com/My-Orders.html?ordernumber=183&orderemail=testing@mvldesign.com The main limitation the My Orders page currently has is that it does not display EVERYTHING about a Gift Certificate that has been ordered. For your largest customers (wholesale users) only the last 30 orders are displayed, and if there are more, a link to NetSuite's Customer Center is provided. In some rare instances, the login box provided by My Orders does not function. Just turn it off via the customization options and a link to the regular login will be provided that will bring your users straight back to My Orders. And though multiple currencies are supported, multiple languages are not. (yet) UpdatesFrom time to time new features will be added to My Orders. Like multiple languages, NetSuite One World, or additional shipping carriers. When My Orders bundle is updated, you will see an Updates are free of charge. My Orders bundle for NetSuite was written by MVL Web Tech, a member of the NetSuite SuiteCloud Developer Network and for over 9 years, developer of high-end, custom NetSuite web sites. |
The cost for a My Orders bundle is a one-time payment of $400. Licence is 'per account' so it can be used on all the NetSuite multi-sites assigned to your NetSuite account. The one-time payment includes all minor updates at no additional charge. If you want us to install it for you, the cost is $500. There are a few methods you can use to purchase. The quickest is to , if you wish to use a debit card. (Change amount in subject line if also ordering installation) Alternately, you can email your request along with you company information to: . We'll send you an invoice to pay via check, credit card, or direct transfer. Once we've received payment, we will make the bundle available for your NetSuite account, usually within the hour. Installing My OrdersInstalling the My Orders bundle is easy. While logged in as an Administrator, visit Setup >> Customization >> Search & Install Bundles. Once the page loads, search for "MWT My Orders". It is bundle # 32599. Click on the MWT My Orders link, then Install >> Install Bundle. You will only be able to do so after we make the bundle available for your account to install. Once the bundle is installed, create an information item that you will use for My Orders. Or Have Us Install My OrdersFor an additional $100 (total payment of $500) we will install My Orders for you. Our installation includes: installing the bundle, creating the information items for up to 3 of your multi-sites, customizing the page to reasonably match your sites style and shopping cart columns, testing the login box, testing the tracking number links, and linking into your site's normal navigation. We will not add links into your email templates but will supply you with the HTML to add. We will also supply you with text links to My Orders that you can add to the body of other information items like FAQs or About Us pages. We will need admin login access and optionally, any features you want off, on or changed. We'll also need a test website login. Include this information with your order and we'll have My Orders up and running before the end of the day. Creating an Information ItemCreating an information item to use for My Orders is simple. In your NetSuite account go to Lists >> Website >> Information Items >> New. Click on Text and Image. Once you've created the new information item, type a page name into the Name field. This will most likely be used as the URL Component. Then, type the text you want to appear on the top of the page in the Detailed Description field. Apply the Item Drilldown Template: MWT / MVL Design - MyOrders INFO item detail. As mentioned below, input any customization styles or JavaScript into the Meta tag HTML. Then link the page into your website. Done. A video is coming which will walk you through the process. Linking to My Orders from emailsNetSuite generates emails that can be sent to your customers at various stages of the ordering / fulfillment process. You can easily swap out the links to tracking numbers or the customer center with a link to your My Orders page that displays the current order, it's status and tracking numbers. The below code will work with custom email templates AND with the email templates found in the Customize Website Text. The HTML to add is: If you use the order emails from the customize text group then you can change all the emails by changing one field. On the Messages sub-tab of customize website text find the field that reads: "If you would like to track the status of your order, please go to {1} to access your account. Log in using the email address and password you provided during checkout." Change it, as above, to be:
|
Customizing The Look |
Customizing My Orders |
The look of My Orders is controlled by a stylesheet embedded into the template. To change the look of My Orders to match the look and feel of your web site is simple. Just add a stylesheet to the META Tag HTML for the information item you have created. Though going over every possible change that can be made to style My Orders is beyond the scope of this page, anyone with a minimal knowledge of CSS can create the needed changes. Since any style that you place into the META tag HTML field will be above the stylesheet that gets loaded, you'll need to add the id tag #myOrdersTD in front of any style changes you make. For instance, to change the color of the reorder button to a light blue, use the following:
Notice that the above changes only change a small sub-set of the style, just enough to make the color changes needed. If your site does not use the NetSuite left side navigation and uses the full width of the site for the content area, you may need to move My Orders content over to the right. If your site is set to 980 pixels fixed-width, to center the content, use the following:
The full stylesheet used to control the look of My Orders can be viewed here: http://www.mvlwebtech.com/MVL-orders.css Items Shipped Not All At OnceThe default setting for My Orders is to not show the shipping status on a per item basis as most users ship the whole order at the same time. For those that often ship items in one order separately, turn on the "showisfulfilled' option. (so named as it gets data from the isfulfilled field on the item listing of the sales order) Then, when an order has items that are in a different state of fulfillment, the shippedimage and notshippedimage will appear. Override the images as you desire to go along with the look of your site. Overriding Tracking Number RulesCreating your own tracking number link rules for My Orders is simple. The default tracking number rules for My Orders determines UPS, FedEx and USPS (United States Postal Service) shipping methods and automatically creates the proper link for the tracking number. If you are outside the USA or you need to add other shipping carriers (like freight carrires) then you'll need to override the default tracking number link rules. Use our convenient configurator to generate the code you will need. First, check the "Override using rules listed below" radio button. The for each of the shipping methods you offer fill in: 1 - The length of the tracking number, 2- The text you want to display for this shipping method, and 3 - The URL the carrier uses to display tracking information. The url MUST end in an = (equal sign). For instance, the URL for one freight carrier would be entered as: http://www.rlcarriers.com/shiptrace2.asp?traceseek=PRO&tracenum= If you override the default tracking number rules to add a freight carrier, the default rules will no longer be used. So, you must add back in rules that may be default rules, like for FedEx or UPS. Here is the code that will set two different tracking number lengths for FedEx and one for a freight carrier:
|
Some of the features and text seen in My Orders can be easily customized or turned on/off. Customization of features / options is done by adding a JavaScript to the META Tag HTML for the information item you have created. A video can be seen below which will walk you through the process. Variables of a specific name are placed inside a function of a specific name. When the page loads, the My Orders template will look for the existence of this function before rendering the page. Each variable is set as: MWTorders.THE-OPTION-NAME = "THE-OPTION-VALUE" For instance, the following code will set the Rate column to read "Price", show the web store display name as the item name, and the itemid as the brief description. See the table on the option configurator page for a complete list of options.
|


 icon in your list of bundles. To get to the list visit Setup >> Customization >> Search & Install bundles >> List. Click the icon in the Action column and select to update the bundle. Click Update Bundle on the bottom right of the next page that loads.